A Power Mod for the Atari 7800


Odd Connections
The power connector on the Atari 7800 can be the biggest obstacle to getting it going. Convert to a more standard connector to get it the power it needs.


Here's a simple, nonintrusive way to use a standard AC adaptor with your Atari 7800.
All you need is some wire, a pair of clip jumpers, and an inline version of the power connector you want to use.
Be aware that this mod is for the US version of the console. I use US-centric notation for the most part, as well.
SAFETY:
As with any mod of this sort, I can only recommend and advise
you on what to do and how to do it. You need to take whatever
necessary precautions against any mishap as you proceed. I can't foresee
all circumstances, so I take no responsibility for any problems
you incur such as fried consoles, fried persons, houses up in
flames, and regional disasters. Use your head and be safe.
The Parts
- A piece of twisted-pair cable, about a foot long. The wires in it should be about 18 guage.
- A pair of micro clip jumpers. You need the "micro" variety so that they'll fit in the box. The micro jumpers are the ones just about 1.75 inches long (about 4.5cm).
- An inline version of the connector you need to hook up to your 9V 500mA (or greater current) AC adaptor. I used a .125" inline phono jack.
Part Substitutions
- Obviously there are a lot of substitutions for the cable. A couple of pieces of 18ga. wire could be twisted together, for example. I wouldn't want to go under 18ga for the wire size. Anything larger may not fit well into the micro clip jumpers, such as 16ga.
- You could solder to the connections inside rather than use clip jumpers. This would probably be safer overall, since it reduces the possibility of a clip jumper coming undone and shorting out somewhere. There are also other small temporary connectors such as small alligator clips. If you use some other type of connector, make sure you have boots over them, or whatever else is necessary to protect against inadvertent electrical contact.
- I recommend that you use a real inline connector rather than
trying to jury-rig something from a bulkhead connector or
whatever. They are only about a buck and a half from your local
or internet electronic parts supplier. You'll get a nice
backshell to hang on to rather than a wad of electrical tape or
whatever you might jury-rig on your own.
There are connectors and clip jumpers that have screw-terminal connections that do not require soldering. Personally I recommend solder, but if you want to use the screw terminals, just be careful of loose strands of wire coming out from under the terminals.
Construction
I cut the cable about a foot long, and cut the outer sheath back about four inches. Then I stripped the ends of the individual wires that were exposed. Slip the caps of the micro clip jumpers over the wires. Then solder the wires to the clip jumpers. Be careful not to overheat the jumper, the plastic melts pretty easily.Once you have soldered the connections here, let them cool for a while before you slip the caps back on so as to avoid melting them.
At this point you may want to slip the other end of the cable through the hole in the 7800's case for the power connector. You can get the clip jumper end through the hole even after the cable is fully assembled, but it's easier to get the bare cable through.
Put the backshell for the inline connector over the cable. Make sure it's facing the right way along the cable. It's frustrating to remember to put the backshell over the cable, but discover that you've got it on the wrong way after you've soldered the connector on.
Strip the other end of the cable and wires for the inline connector you got. Many bubble-pack connector packages will have the proper dimensions printed on the back of the package. Otherwise, use your good judgement. Make sure you get the polarity right to match your AC adaptor. In the case of my Atari 2600-compatible connector, the positive pole goes to the tip connector.
Finish assembly by putting the backshell on the connector. If you have a multimeter or ohmmeter I recommend ringing out the cable to make sure everything is going where you think it is.
Installation
The cable is passed through the hole in the 7800's case where the power connector sits. This hole is rather generously sized. I have managed to miss the power connector entirely with the standard power cable that comes with the 7800 and shove the end of it into the case through this hole.
If you didn't put the cable through the hole during construction of the cable, you can put the clip jumper end through now. The clip jumpers will have to be put through one at a time.
Once you have the jumpers through, you want to tie a knot in the cable to provide some strain relief for the connectors. You don't want a tug on the cable to pull the clip jumpers loose and let them fly around inside the 7800 with power on.
I used a figure-eight knot, and made sure there was enough cable between the end of the knot and the clip jumpers that the cables would not be budged when I pulled on the cable from outside to pull the knot up against the opening. If you aren't enough of a Boy Scout to kow the figure-eight knot, a simple overhand knot should do as well. If you used something like a pair of 18guage wires without a nice bulky sheath around them, then you'll need to improvise. Perhaps you can tie them to something nonconductive that won't fit through the hole. Or you can wrap it a million times with electrical tape. Now you see why I used some sheathed twisted-pair cable.
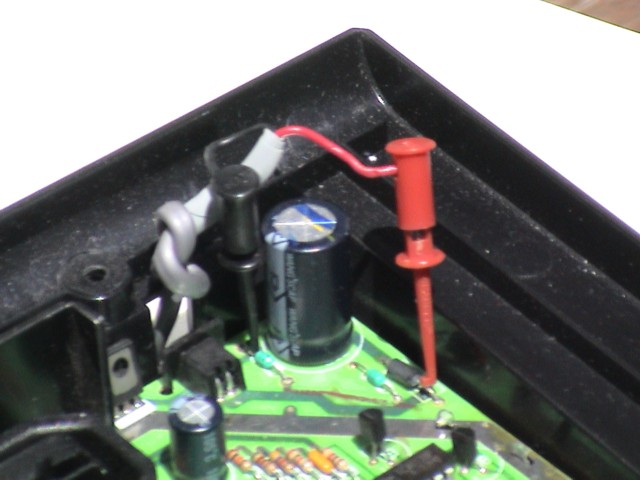
Once you've sorted out the strain relief, attach the connectors as in the photo above. The positive connection is the light jumper, attached to the lead of a diode near the power cap. Attach to the lead on the same side as the white line on the diode.
The negative connector is a bit harder to see in the picture, since it tries to hide behind the capacitor. It is connected to the lead nearest the back of the little green part there between the power connector and the electrolytic capacitor.
Do a "smoke test" on the console before plugging in a cartridge or hooking up to a television. Plug it in and power it up somewhere where you can disconnect the power easily if you happen to have it hooked up wrong. Protect your eyes and skin in case the electrolytic cap pops. Hopefully you carefully checked the polarity of everything and the little red LED comes on. Now you're ready to plug in your cartridges and play some games.
Return to the 7800 Mod Page